 From whales to birds, and bears and beyond – photographer Bart Rulon has seen and shot it all. Bart is leading our 2017 Wildlife Photography Expeditions (May 9-11 & September 19-21) in the San Juan Islands. These photography workshops are geared toward passionate photographers who want to spend the extra time with whales & wildlife in order to get the best shots. However those trips are limited to just 8 participants – so we asked Bart to come up with a list of his top wildlife photography tips – techniques that anyone can use.
Top 12 Wildlife Photography Tips
by Bart Rulon
1. Be familiar with your camera
After purchasing a new camera don’t just go right out and start photographing before you know how to use it correctly. It is important to read your camera user’s manual. Digital cameras are becoming more and more complex, and they have many options you can customize to better suit your specific goals. Go through your manual and practice in your backyard in order to set up your camera for wildlife photography before you use it in the field.
2. Spend enough time with your subject
Be patient when you are photographing animals. Don’t just take a few shots and move on because you are likely to miss good opportunities and potential action. Sometimes it’s only a matter of time before your subject becomes active or interacts with another animal.
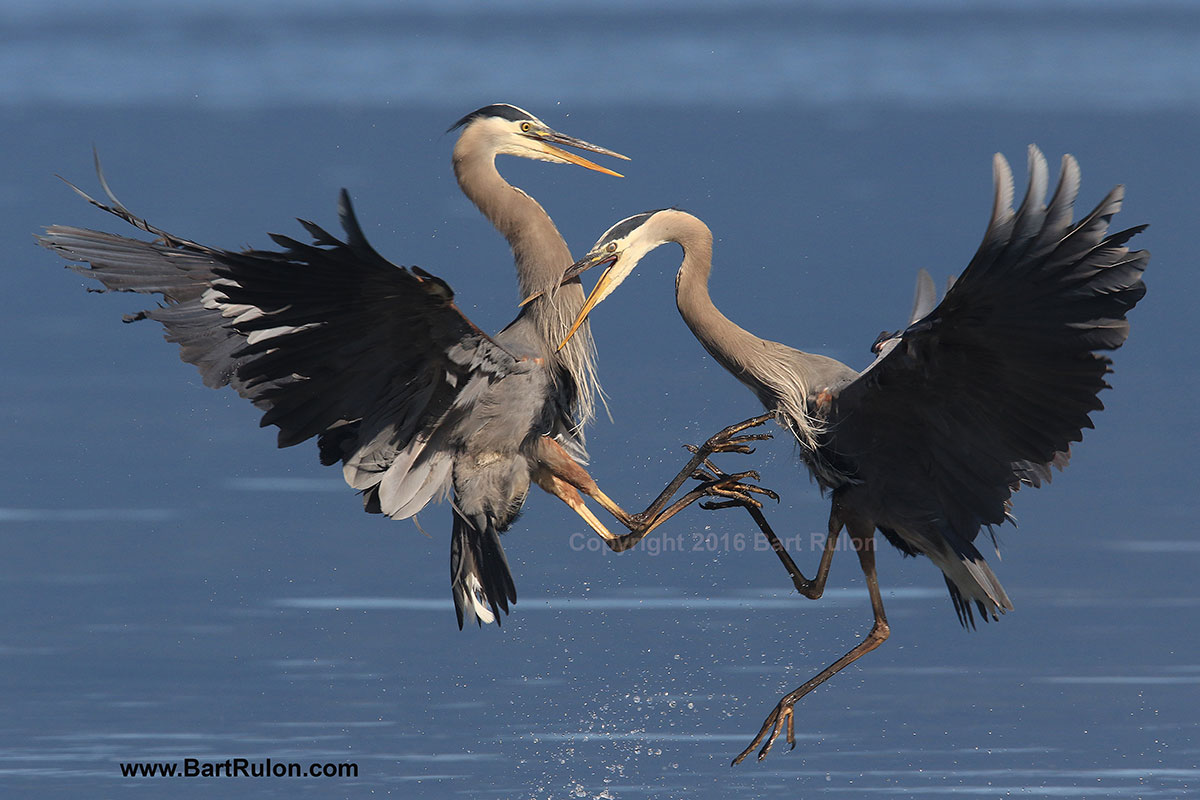
For a long time the heron on the left wasn’t doing much except standing still, but I didn’t give up on him. Patience paid off when a second heron flew in and a fight erupted!
3. Pay attention to the angle of light
Photographs usually turn out best if you have the sun behind your back so that your subject is fully lit up. However, sometimes your subject might look better backlit or sidelit under different circumstances. For example white subjects, like an egret or a swan, often look fantastic backlit against a dark background. The halo effect can be very artistic.
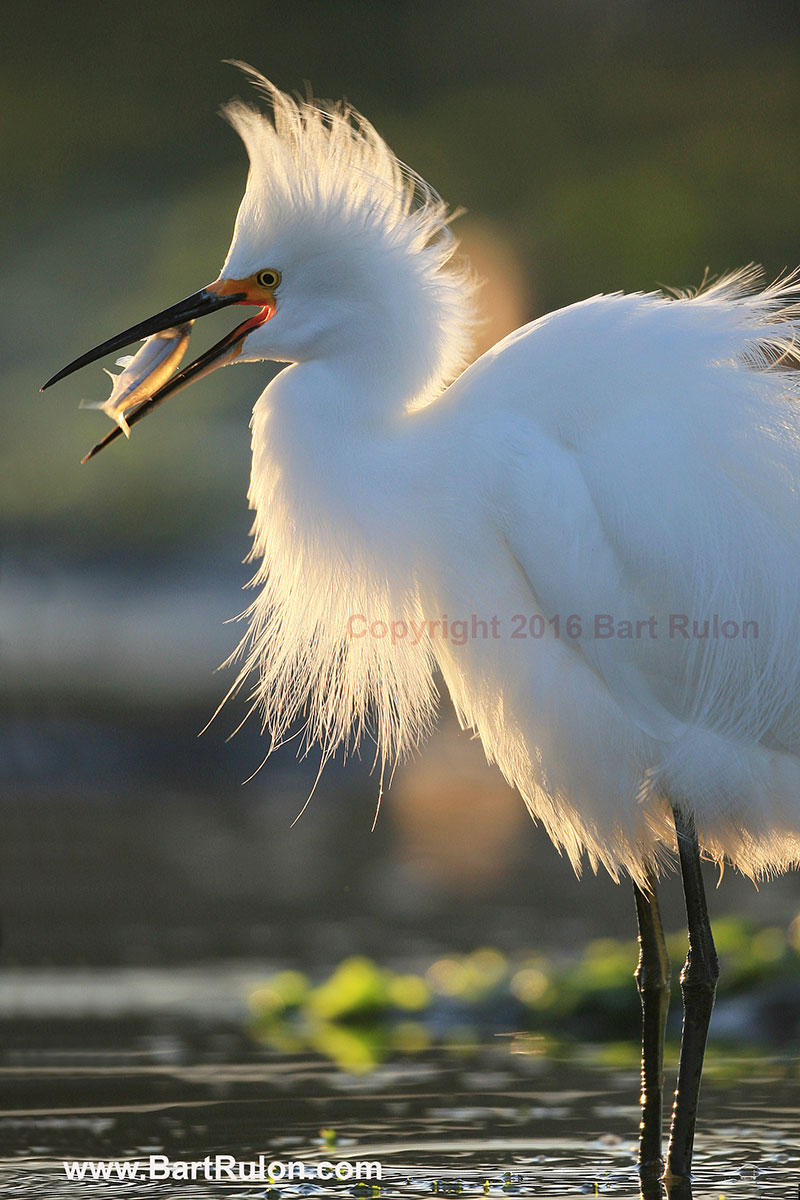
The lighting on this egret looked much more interesting with the bird backlit instead of front lit. Sometimes you have to try different angles to see what looks best.
4. Photograph in Raw format
By photographing in raw format you help insure yourself against making mistakes. Raw format photos allow you to change important image factors after the photo has been taken to make your photos look better. You can change the photo as if you got everything right in your camera to begin with, in many cases! If your picture is underexposed or overexposed, you can correct the exposure, within a certain dynamic range. You can also change other settings such as white balance, picture styles, contrast, color saturation, and sharpness after the photo has been taken. Raw photos will require processing after the picture is taken either with software on your computer, or inside the camera in some models.
5. Check your exposure
One of the best advantages of digital photography is that you can check the accuracy of your photo right after you take the shot. Don’t trust the image on the back of your camera though because it can be misleading. It’s much more accurate to learn how to use your histogram and highlight alert to judge whether or not your image was exposed correctly. Don’t let any of your images fall off either end of the histogram for the best results. It takes practice to learn how to read a histogram correctly. The highlight alert blinks with black and white on any area that you have overexposed to pure white. The blinking spots will have no details except pure white. Underexpose the next few photos in different increments until you find the settings that don’t result in any “blinkies”.
6. Stabilize your camera with a tripod, monopod or other means whenever possible
On land it’s almost always best to use a tripod. On a boat a monopod or hand holding is a better choice. In a car a bean bag placed over the door with an open window is best. You need to keep your camera and lens as stable as possible for best results unless you are tracking a moving subject. When one of these options isn’t practical you can rely on the image stabilization or vibration reduction in your camera.
7. Pay attention to the background behind your subject
Be careful to avoid busy backgrounds behind the focal point of your subject (usually the head). Sometimes all you have to do is move your vantage point a bit to clean up the background. Also, be sure to include background elements that might enhance your photo, like a mountain range.
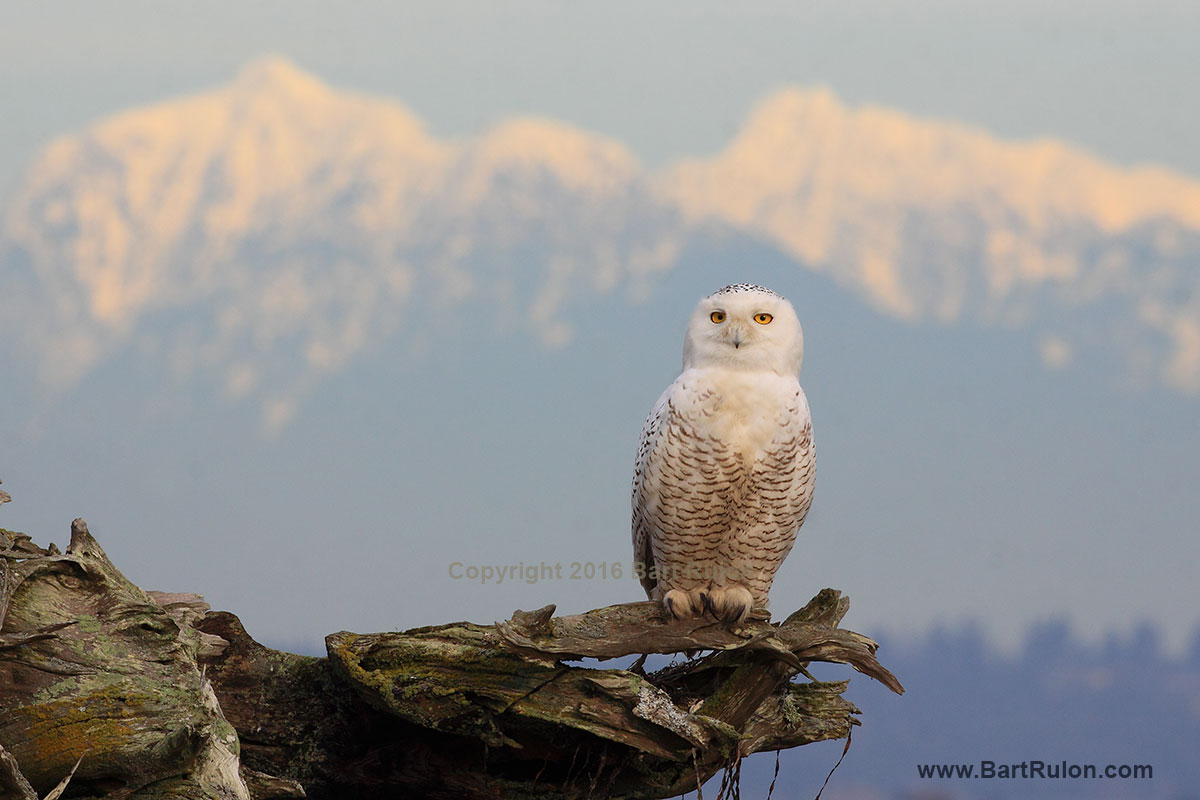
In this photograph I wanted to take advantage of the scenic mountains behind the owl first. I was also careful to position the camera so that there were not any distracting elements directly behind the owl’s head.
8. Focus on the head and eyes of your subject
With a telephoto lens the depth of field for focus is typically very narrow, so choose your focus points wisely. This can make the difference between a great photograph and a mere throw away. The farther away you are from your subject the less this will matter.
9. Make sure your shutter speed is high enough
In order to capture the action you must make sure that your shutter speed is high enough to freeze the moment. If the animal is not moving quickly then you might be able to get away with slow shutter speeds like 125 or 250. When your subject moves you have to increase the shutter speed. 1000 or higher is best, and for quick action you may have to push the shutter speed to 2000 or 4000. Birds in flight and breaching whales require higher shutter speeds. The faster the wingbeats the faster the shutter speed needed. You might only need 1000 for the slow wingbeats of an eagle or great blue heron in flight, but the fast wingbeats of a green winged teal might require 4000.
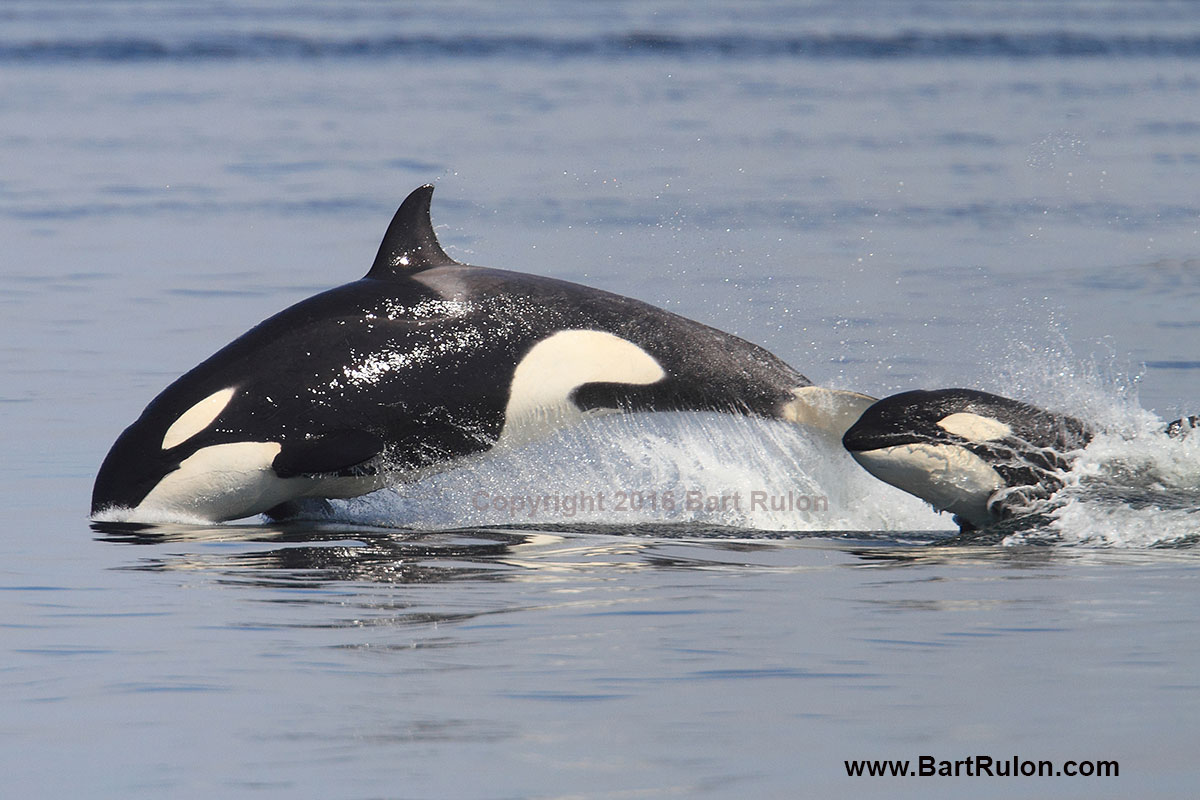
A shutter speed of 4000 helped me freeze the action when these transient killer whales went on the hunt!
10. Analyze your photographs
Analyze your photographs on the computer to find out what settings work or don’t work, and make adjustments for the future. This is especially helpful if you will be photographing the same subject for a couple days in a row. You can analyze how well your exposure, aperture, shutter speed and white balance settings worked for you, and make changes in order to get your desired results. This is a great way to understand how your histogram indicates exposure in different lighting situations.
11. Research your subject
If you have a particular wildlife species you want to photograph, be sure to find out the best locations and times of the day /year to photograph it. Some animals migrate, and others look better during one part of the year versus another. For example, many birds look their very best in the spring then when they are in their breeding plumage trying to impress their mates.
12. Stay focused on your subject
Don’t get distracted by fellow photographers and your cell phone. All too often when a group of photographers are gathered together targeting a common subject they tend to talk too much and lose their focus, missing good shots. Keep your senses focused on your subject and you won’t miss the good stuff.
Bart Rulon’s award winning art and photographs have been shown in over 60 museums in North America and abroad, and his work is included in the permanent collections of the Leigh Yawkey Woodson Art Museum, the Bennington Center for the Arts, and the Massachusetts Audubon Society. Bart has written and illustrated 5 books about his photography and art, published by North Light Books, and he has been a contributing author/artist/photographer in over 10 additional books.
He teaches at the University of Washington and was awarded their “Teaching Excellence Award” in 2009.